 Admin
AdminHow to Do Contouring for Beginners, Step by Step
The first time I tried contouring, I looked less “sculpted cheekbones” and more like I’d been hit with a dirty smudge. If you’ve had a similar disaster, you’re not alone — contouring for beginners is genuinely one of the trickiest makeup skills to get right, mostly because of blending, not the actual application.
Let’s break this down properly, without the confusing jargon most tutorials throw at you.
What Contouring Actually Does
Contouring uses shadow and light to reshape how your face appears in photos and in person. It’s basically an optical illusion — darker shades recede, lighter shades come forward.
Direct answer: Contouring for beginners works by applying a matte, cool-toned shade slightly darker than your skin to areas you want to appear smaller or shadowed, like the sides of your nose and under the cheekbones, then blending it seamlessly into the skin.
Sounds simple in theory. In practice, blending is where 90% of people go wrong.
Choosing the Right Contour Shade
This is the single biggest mistake beginners make — picking a shade that’s way too warm or too dark. Your contour shade should be cool-toned and only 1-2 shades darker than your natural skin, never orange or bronzy unless you’re specifically going for a sun-kissed bronzer look.
- Fair skin: taupe or soft grey-brown tones
- Medium skin: cool caramel or neutral brown
- Deep skin: rich chocolate or espresso, still cool-toned
If your contour looks like a dirt smear rather than a natural shadow, the shade is probably too warm.
Cream vs Powder Contour — Which to Start With
I always tell beginners to start with cream contour, even though powder feels more familiar. Cream blends more forgivingly and gives you a chance to build up slowly rather than committing to a harsh line immediately.
Powder contour is great once you’ve got the placement down, but it can look patchy over dry skin if you’re still learning.
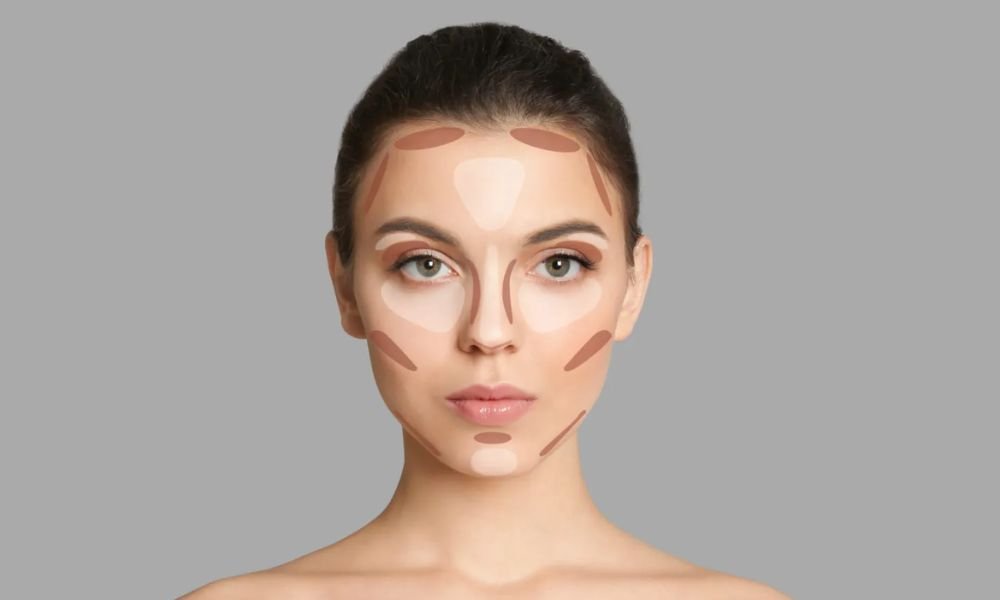
Where Exactly to Apply It
This is where most tutorials get overwhelming with fifteen different zones. Let’s simplify.
- Hollows of the cheeks (suck your cheeks in to find this spot)
- Sides of the nose, if you want it slimmer looking
- Jawline, just under the bone
- Temples, along the hairline
- Under the chin, if you want to minimize a double chin
Don’t feel like you need to do all five every single time. Start with just the cheek hollows and jawline — that alone makes a noticeable difference.
The Blending Technique That Changes Everything
Direct answer: The key to natural-looking contouring for beginners is using a damp makeup sponge in gentle bouncing motions rather than dragging or wiping, since dragging pulls product and creates harsh, visible lines instead of soft shadows.
I switched from a brush to a damp sponge about a year into wearing makeup regularly, and honestly, it was a game changer for how natural my contour looked afterward. A dry brush tends to leave streaky edges that no amount of setting powder can fully fix.
Common Contouring Mistakes to Avoid
- Applying too much product at once (build up slowly instead)
- Skipping the blend and going straight to setting powder
- Using a shade with orange undertones
- Contouring in a straight line instead of following your bone structure
- Forgetting to blend contour into your neck or ears for photos
Picture a college student in Mumbai getting ready for a friend’s birthday, applying contour under harsh yellow tube lights, only to step outside and realize it looks completely different in daylight. Always check your work near a window if you can.
Tools You Actually Need
You really don’t need a twelve-brush set for this. A dense contour brush, a damp beauty sponge, and a small fluffy brush for softening edges will cover you completely as a beginner.
FAQ
Is contouring necessary for everyday makeup? No, it’s optional. Many people skip it for daily wear and save it for events or photos.
What’s the difference between contour and bronzer? Contour is meant to create shadow and shape; bronzer adds warmth and a sun-kissed glow all over.
Can oily skin do cream contour? Yes, just make sure to set it well with a translucent powder to avoid it sliding off.
How do I fix contour that looks too harsh? Blend more with a damp sponge, or add a touch of foundation over the edges to soften them.
Do I need contour and highlighter together? They work best together since highlighter brings forward what contour pushes back, creating balanced dimension.
What age should someone start learning to contour? There’s no set age — it depends more on comfort with makeup basics like foundation and blending than age itself.
Conclusion
Contouring for beginners doesn’t have to be intimidating once you understand it’s really about shadow, light, and patient blending. Start small with just the cheeks and jawline, use a damp sponge, and build confidence from there. Your first attempt won’t be perfect, and that’s completely fine — mine certainly wasn’t.